Table of contents
Structure for the folder 'Code'
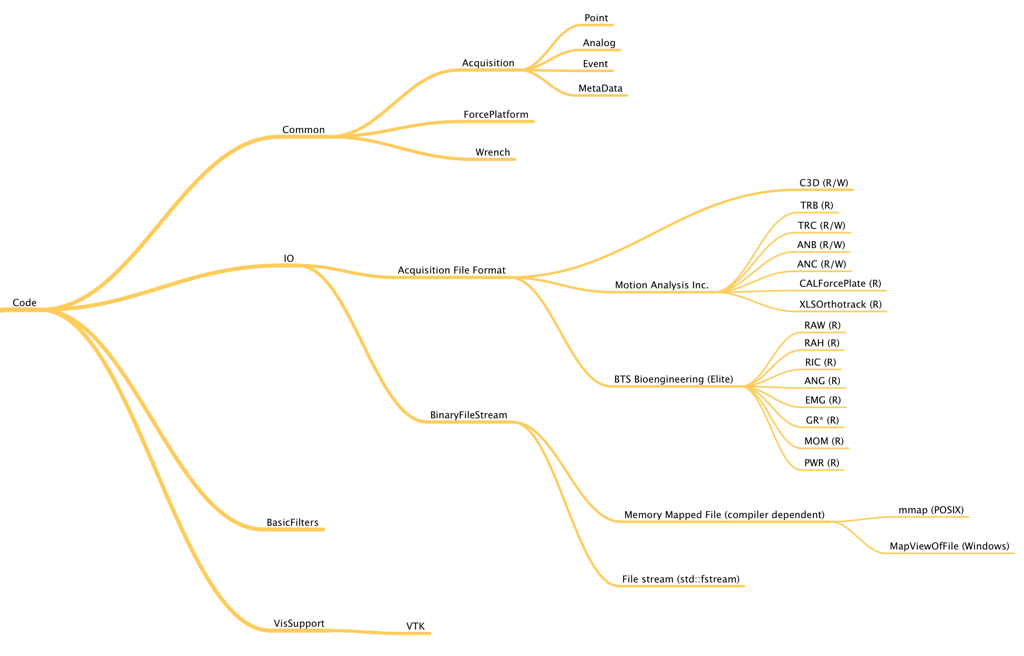
The internal structure of the code in BTK can be presented in 4 groups:
- Common: All the objects which should be common to the other kits ;
- IO: The Input/Output classes used to read/write the acquisition file format ;
- BasicFilters: Filters (processes) to transform an acquisition ;
- VisSupport: Kit to be able to visualize data from BTK object.
Each group names a kit and creates a specific library. Then, for the moment, BTK is composed of four libraries:
- BTKCommon ;
- BTKIO ;
- BTKBasicFilters ;
- BTKVTK (subfolder of VisSupport using the VTK library).
The use of this structure can give a better reading of the developer to know where to find the code of the desired class or where to add its new class.
Moreover, by using these kits you have the possibility to link only the library used in your code. For example, in AcquisitionConverter, only the kit BTKIO is linked to the executable (BTKCommon is implicitly linked as used by BTKIO).
Finally, the following graph gives you a simplified view (mind map) of the internal structure of the code.

Pipeline's mechanism
Principles
As already presented in the first tutorial, a pipeline is a composition of processes linked together by their input(s) and output(s).
The implementation of this pipeline is then based on two primary classes:
- btk::DataObject: the input/output ;
- btk::ProcessObject: the process itself.
These two classes has in common the use of a timestamp, which determine when the object has been modified for the last time. So the modification of one of these objects is immediately known and will be reflected in its next update. To modify the timestamp of these object, you have to use the method btk::Object::Modified. To update the process (and then, the pipeline), you have to use the method btk::DataObject::Update() or btk::ProcessObject::Update(). Updating an output will automatically update its parent's process. So the following snippets have the same behavior: update the pipeline. The way to do this depends of your need in your program Example Let's use a simple pipeline composed of an acquisition reader, a force platform extractor and a filter to compute the ground reaction wrenches. This code will be use by the snippets.
- Updating the process The use of the method btk::ProcessObject::Update has for consequence to check if the input of the btk::GroundReactionWrenchFilter object is updated. If it is not the case, then the algorithm check the state of the input's parent and continue until it finds every input/process updated. Finally, it can process itself and update theses outputs.
- Updating one of the outputs Instead of updating the process, you can do it on the output. This has for consequence to call the Update method of its parent.
If the process has more that one output it is not necessary to update all of them. The use of the method btk::DataObject::Update, will update its process and then all outputs are updated. Trying to update a process already updated does nothing. The timestamp is here to verify this.
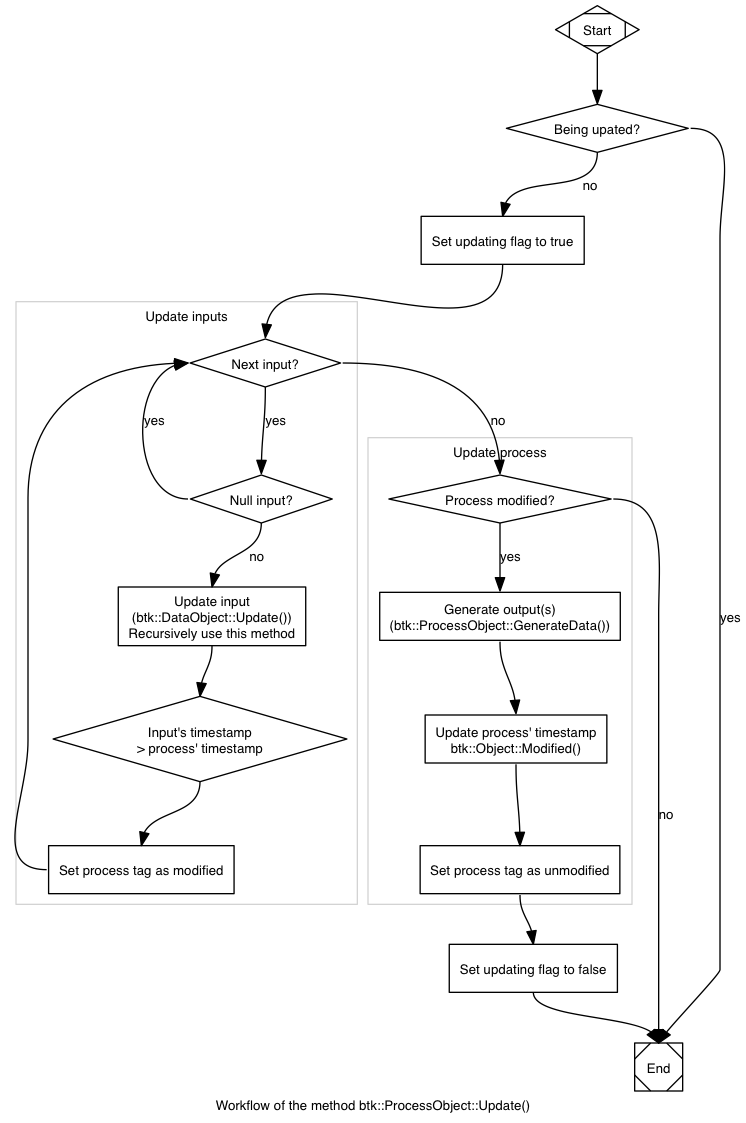
The next graph presents the mechanism used to update a pipeline. It will help you to understand how it is realized.

Implementing a process
All the classes representing a process must inherit of the class btk::ProcessObject. Inheriting of this class gives you the possibility to focus only on the methods related to the process and not on the mechanisms of the pipeline. First, you need to define in the filter's constructor the number of inputs and outputs. By default, the btk::ProcessObject initialize one input and one output.
As the class btk::ProcessObject is a pure virtual class, it is required to overload these methods:
- virtual DataObject::Pointer ProcessObject::MakeOutput(int idx);
- virtual void ProcessObject::GenerateData();
The method btk::ProcessObject::MakeOutput creates the process' output(s). A simple overload of this method can be:
All the outputs are always returned as a DataObject::Pointer (as they are stored in the process as a vector of DataObject::Pointer, like the input). So the created output object must inherit of the class DataObject. Otherwise, the compiler will generate an error.
The method ProcessObject::GenerateData is the core of the filter as it is in this method that the output(s) is(are) updated. In this method, you can for example:
- Check the inputs' validity ;
- Reset the output(s) ;
- Generate the content of the output(s).
Note: In the method GenerateData you cannot create a new input using the static method New. If you do this, the modification will be reflected only inside the method. This is due to the use of the pointer. Furthermore, trying to set a new pointer to the output by using the method ProcessObject::SetNthOutput has for effect to unlink the processes which use this output in their input. This is why you have to reset the output or assign some default values.
How to add a new file format
As described in the first tutorial, an acquisition can be read or written by the filters btk::AcquisitionFileReader and btk::AcquisitionFileWriter respectively. But the code which extract the information from the file or put it inside is inherited from the class btk::AcquisitionFileIO. If no acquisition file IO is set, then the reader/writer asks to the AcquisitionFileIOFactory to return the corresponding file IO able to read/write the given acquisition. Adding a new file format requires to create a new class and register it in the factory. Internally, the registration is realized in the file btkAcquisitionFileIOFactory_registration.cpp (but externally the method AcquisitionFileIOFactory::AddFileIO can be also used to register dynamically a file format).
Even if you can name you IO class as you want, BTK use the following syntax to recognize them: btk<file_extension_in_capital>FileIO. If you want to use exceptions specific to this file IO, you can declare an exception class in the same file. For example:
The file IO class requires to implement 4 methods:
- virtual bool CanReadFile(const std::string& filename);
- virtual bool CanWriteFile(const std::string& filename);
- virtual void Read(const std::string& filename, Acquisition::Pointer output);
- virtual void Write(const std::string& filename, Acquisition::Pointer input);
The methods Can(Read|Write)File are used by the method btk::AcquisitionFileIOFactory::CreateAcquisitionIO to detect if the given file corresponds to this format or not. Generally, the method CanReadFile checks if the beginning of the file corresponds to its header while the method CanWriteFile checks only if the extension is supported or not.
If you want to implement only the read or write part of the acquisition file IO, then you can use the macro BTK_FILE_IO_ONLY_READ_OPERATION or BTK_FILE_IO_ONLY_WRITE_OPERATION. These macros overload the methods CanReadFile/Read or CanWriteFile/Write respectively.
The macro BTK_FILE_IO_SUPPORTED_EXTENSIONS stores the supported extensions for the new IO. More informations are available in the documentation of the class AcquisitionFileIO.
To include you new file format in the function btk::AcquisitionFileIOFactory::CreateAcquisitionIO, you have just to add one line inside the file btkAcquisitionFileIOFactory_registration.cpp using the macro BTK_REGISTER_ACQUISITION_FILE_IO:
Finally, the methods Read and Write contain the code to extract the data from the file to the acquisition or from the acquisition to the file respectively. The code will require to use a file stream. By default, BTK uses its own class for the binary file: btk::BinaryFileStream and the class std::fstream for the ASCII file. In the case of a binary file you can use this code:
 1.8.5
1.8.5