File
The menu File contains the actions to interact with acquisition.
Open: Selection of the acquisition to loadOpen Recent: Menu with the 10 last acquisitions openedClear Menu: Clear the list of the recent files opened
Reload: Reload the same file in useOpen File Location: Open the folder where the file is locatedSave: Save the modified acquisitionSave As: Save the acquisition as a new oneImport: Menu to insert an acquistion or a part of it (EMG, force platform data, ...)Assistant: Generate an acquisition using all files used by known acquisition system. More details on this page.C3D file...: Import and merge a C3D file to the existing acquisitionMotion Analysis Corp.TRB file...: Import and merge a TRB file to the existing acquisitionTRC file...: Import and merge a TRC file to the existing acquisitionANB file...: Import and merge a ANB file to the existing acquisitionANC file...: Import and merge a ANC file to the existing acquisitionCAL file...: Import and merge a force platform calibration (CAL) file to the existing acquisitionXLS OrthoTrak Files...: Import and merge a XLS file generated by the software OrthoTrak to the existing acquisition
BTS EngineeringTDF file...: Import and merge a TDF file to the existing acquisitionRIC file...: Import and merge a RIC file to the existing acquisitionRIF file...: Import and merge a RIF file to the existing acquisitionRAH file...: Import and merge a RAH file to the existing acquisitionRAW file...: Import and merge a RAW file to the existing acquisitionANG file...: Import and merge a ANG file to the existing acquisitionEMG file...: Import and merge a EMG file to the existing acquisitionMOM file...: Import and merge a MOM file to the existing acquisitionPWR file...: Import and merge a PWR file to the existing acquisitionGR* file...: Import and merge a GR* file to the existing acquisition
CodamotionMDF file...: Import and merge a MDF file to the existing acquisitionMDR file...: Import and merge a MDR file to the existing acquisitionXMOVE file...: Import and merge a XMOVE file to the existing acquisition
AMTI forceplate file...: Import and merge a ASC file to the existing acquisitionAscension EMF file...: Import and merge a EMF file to the existing acquisitionContec CLB file...: Import and merge a CLB file to the existing acquisitionDelsys EMG file...: Import and merge a Delsys EMG file to the existing acquisition- Video files (
AVI,MOV,MPEG,OGG,WMV)
Export: Menu to export a part of the acquisition on the selected Region of Interest (ROI)C3D file...: Export the acquisition in the C3D formatMotion Analysis Corp.TRC file...: Export the acquisition in the TRC formatANB file...: Export the acquisition in the ANB formatANC file...: Export the acquisition in the ANC formatCAL file...: Export the acquisition in the CAL format
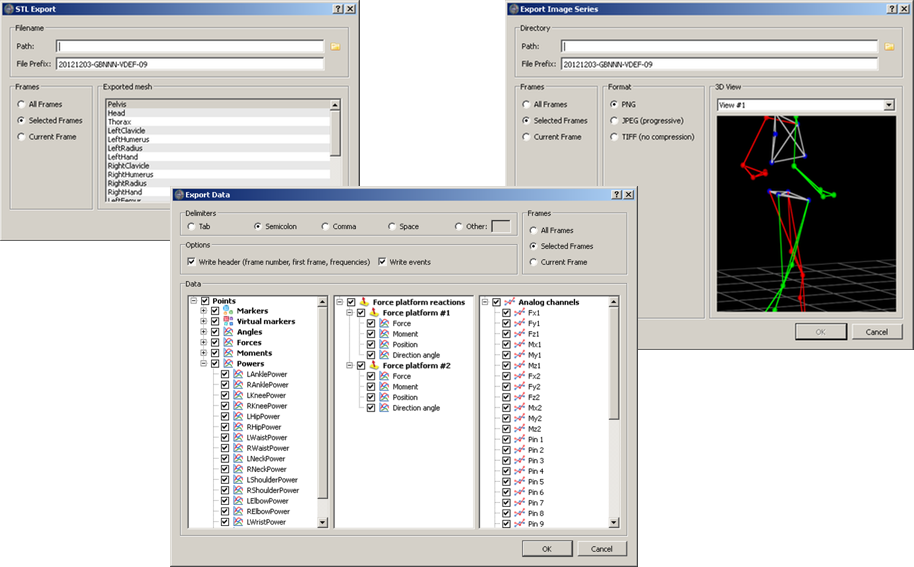
ASCII / Text files...: Export the selected data in ASCII or text files with the proper options and framesSTL files...: Create STL files from a selected segmenImage Series...: Export the image series for the selected frames, format and view
Close File: Close the opened acquisition and reset the displayQuit: Quit the Mokka application
Note: For more information about the rules to merge or concatenate acquisitions together, check this page.
Edit
Undo: Undo the modifications done previouslyRedo: Redo the last modificationsCut: Cut the selected text and put it in the clipboardCopy: Copy the selected text and put it in the clipboardPaste: Paste the selected text and put it in the clipboardSelect All: Select all the text in the focused widgetOptions: Edit the preferences of Mokka by changing:- General
- Visualization (Background, Segment, Marker and Force platform)
- Chart (Plot, Graph, and Cycle Settings)
- Layout
- Advanced options Note: The menu
Optionsis replaced under MacOS X byPreferencesin the application menu.
View
The menu View contains the actions to toggle dock windows related to the data into the loaded acquisition
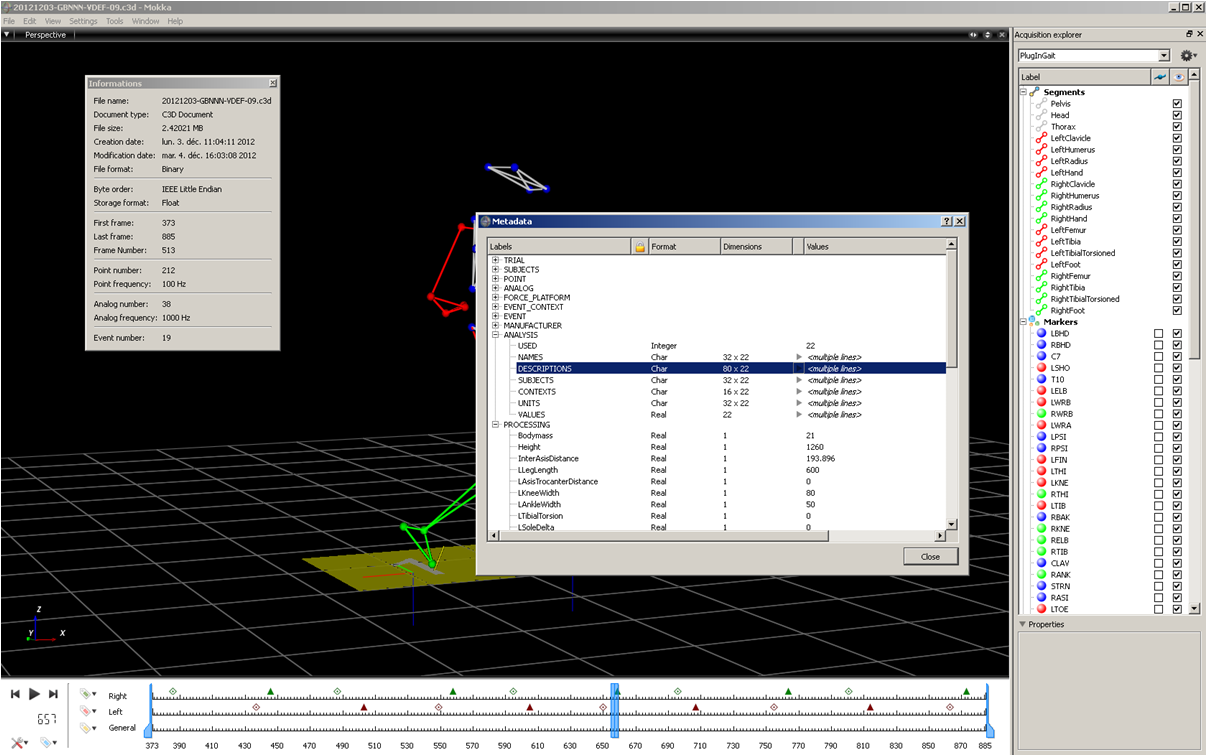
Acquisition explorer: Show/Hide acquisition explorer paneInformations: Show/Hide file informationsMetadata: Show/Hide metadata information (read-only)
Settings
The menu Settings contains actions related to the 3D view
Visual ConfigurationDeselect configuration: Deselect the current visual configuration and reset the configuration of the markers (color white, diameter of 8 mm)Clear configuration: Clear the list of known visual configuration
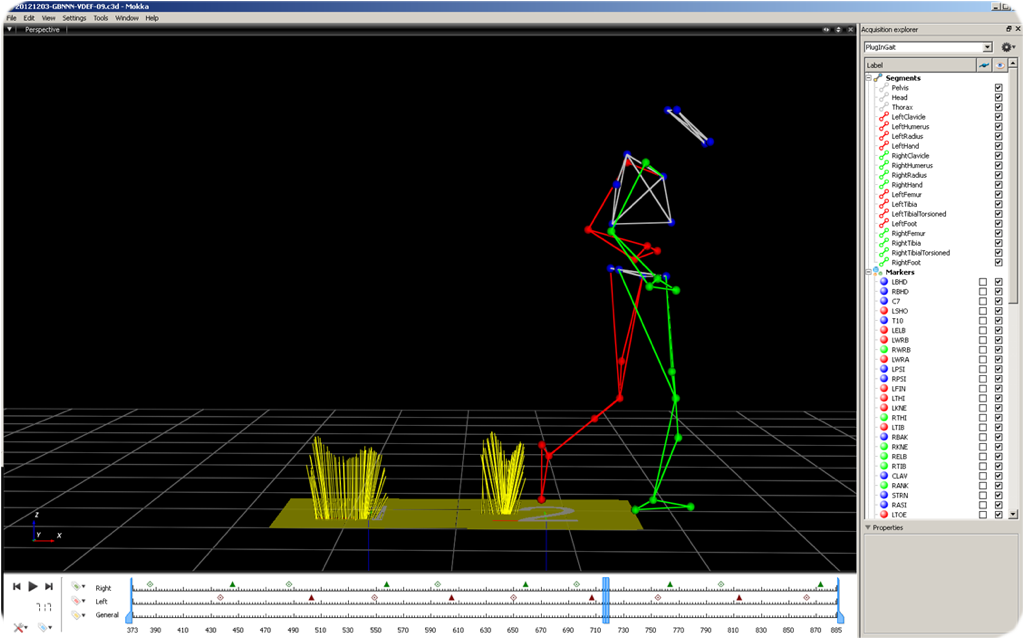
Playback speed: Select the playback speed (see Playback speed)Ground Orientation: Select the ground orientation (see Ground orientation)Marker Trajectory Length: Select the length of the markers' trajectory (see Marker Trajectory Length)Toggle GRF Butterfly: Show/hide ground reaction forces butterflyHorizontal Axis Unit: Change horizontal axis unit (Time,FrameorCycle) for all charts. Within Cycle option, you can display graph by full gait cycle or manage cycle settings with different options. For this last point, you will find more details in the tutorial: Create a cycle definition.
Tools
The Tools menu section represents a shortcut menu that integrates useful options related to model, acquisition, event and marker. More details on these tools are available in the section Tools / Data processing.
Model:Create a new segment
Acquisition:- Zoom frames of interest, crop frames of interest or reframe from one the loaded acquisition.
Event:Gait Event Detection: Chose detection and mapping methods to detect gait events. This will overwrite existing events or Append to existing events, as selected.- Insert, edit (Ctlr+E), remove (Del) or clear events. This can be also done by using several shortcuts
- Alt + 1: Insert foot strike
- Alt + 2: Insert foot off
- Alt + 3: Insert event
- Alt + 4: Insert left foot strike
- Alt + 5: Insert left foot off
- Alt + 6: Insert left event
- Alt + 7: Insert right foot strike
- Alt + 8: Insert right foot off
- Alt + 9: Insert right event
Marker:- Create an average marker by selecting a minimum of two markers
- Compute and plot distance between two selected markers
- Compute and plot angle between three selected markers
- Compute and plot angle between two vectors by selecting three or four markers
Analog:Remove offset: Possible for reference or selected frame)Filter analog (Butterworth): Apply Butterworth filter for specific or all analog channels with the selected Filter options (Type, Zero Lag, Order, and Cutoff). This will overwrite or create new channels, as selected.Rectification: Overwrite selected analog channels data or create new analog channels.Scale: Scale selected analog channels using scaling rules options. This will overwrite or create new analog channels, as selected.Smooth / Linear Envelop: Smooth selected analog channels using Smoothing methods (Root Mean Square / Moving average) options. This will overwrite or create new analog channels, as selected.
Window
In the window section you have the possibility to change the actual layout and / or save the current configuration. The first three layouts are predefined in the software. You can switch easily between layout using the key Ctrl (Command for MacOS X) and the index of the layout. Only the first ten layouts have a shortcut.
Layouts:Manage Users Layouts: Open theLayoutspreferences to delete, rename or reorder the user configurations.3D Only: Predefined layout with only one 3D view3D Verbose: Predefined layout with one 3D view and a logger split vertically3D And Charts: Predefined layout with one 3D view on the left and one chart for the points and the analog channels on the right.- All other layouts saved by the user
Save Current Layout: Save the current layout for your next use or modify an existing one.
Help
About: Dialog box with the release number of MokkaMokka Help: This current helpVisit Mokka website: Visit the Mokka website to see details, related news and moreVisit BTK website: Visit the main website (BTK) of the project to see the latest developmentsCheck for Updates...: Check on the web server if a new version was released. This option can be check in the Advanced Preferences option. This will automatically check for update at startup of Mokka.